Installing a radon mitigation system is an essential step for homeowners looking to reduce radon gas levels in their living spaces. Radon is a naturally occurring radioactive gas that can seep into homes through foundation cracks, gaps, and porous building materials. Prolonged exposure to elevated radon levels is linked to an increased risk of lung cancer, making mitigation a critical aspect of maintaining a safe home environment. Proper installation of a radon mitigation system ensures that the gas is efficiently vented outside, minimizing health risks while maintaining indoor air quality. Understanding the installation process, the components involved, and safety considerations is key to achieving effective radon reduction.
Understanding Radon and Its Risks
Radon is an invisible, odorless gas produced by the natural decay of uranium found in soil, rock, and groundwater. It can accumulate to high levels indoors, particularly in basements, crawl spaces, and lower levels of homes. The Environmental Protection Agency (EPA) recommends action when radon levels exceed 4 picocuries per liter (pCi/L). Testing for radon is the first step in identifying the need for a mitigation system, as levels can vary greatly from one home to another depending on construction and location.
Testing for Radon
- Purchase a radon test kit from a hardware store or online vendor. Short-term tests typically last 2-7 days, while long-term tests can last up to 90 days.
- Place the test in the lowest lived-in level of the home, away from drafts, high humidity, and direct sunlight.
- Follow instructions to send the test to a certified laboratory for analysis.
- If radon levels exceed recommended limits, a mitigation system installation is necessary.
Types of Radon Mitigation Systems
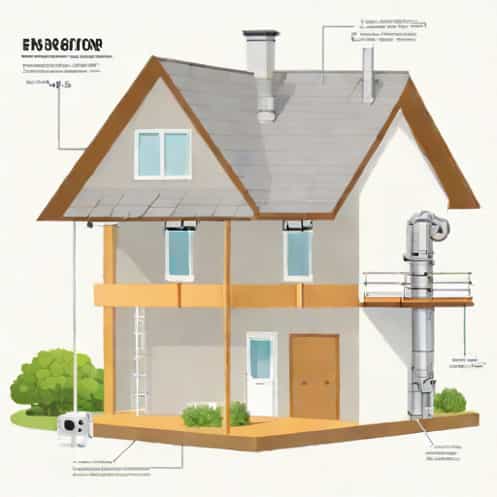
Several types of radon mitigation systems exist, but the most common and effective method is the sub-slab depressurization system. This method involves creating a vacuum beneath the foundation to vent radon gas safely outside.
Sub-Slab Depressurization
- A PVC pipe is inserted through the concrete slab or basement floor into the gravel layer below.
- An inline fan is installed to draw radon from beneath the slab and vent it above the roofline, away from windows and air intakes.
- Sealing major cracks and openings in the foundation enhances system efficiency.
Crawl Space Systems
- For homes with crawl spaces, a vent pipe is installed from the crawl space to above the roof, often with a fan to increase airflow.
- Covering the crawl space with a thick plastic membrane prevents radon entry into the living areas.
Other Options
In some cases, passive ventilation systems or sub-membrane depressurization can be sufficient, but active systems with fans are generally more reliable, especially in areas with high radon concentrations.
Tools and Materials Needed
Proper installation requires the right tools and materials to ensure safety and effectiveness. Key items include
- PVC piping and elbows to route radon vent outside.
- Inline radon fan rated for continuous operation.
- Concrete sealant or caulking to seal cracks in the foundation.
- Drill with masonry bits for penetrating the slab.
- Plastic sheeting for crawl space coverage if applicable.
- Pressure gauge to monitor system performance.
Step-by-Step Installation Process
Installing a radon mitigation system requires careful planning and adherence to safety guidelines. Homeowners can perform installation themselves in some cases, but hiring a certified professional is often recommended for optimal results.
Step 1 Identify Entry Points
- Inspect the foundation for cracks, gaps around pipes, and floor-wall joints where radon could enter.
- Mark areas for pipe installation and sealing.
Step 2 Drill the Suction Point
- Drill a hole through the slab or basement floor to reach the underlying gravel or soil layer.
- Ensure the hole is slightly larger than the PVC pipe to allow for easy insertion and sealing.
Step 3 Install PVC Pipe
- Insert the PVC pipe into the drilled hole, extending vertically to the desired vent location.
- Use elbows as needed to navigate around obstacles and ensure smooth airflow.
Step 4 Seal Cracks and Openings
- Use concrete sealant or caulk to close foundation cracks and gaps around the pipe.
- This prevents radon from bypassing the system and entering the home.
Step 5 Install the Radon Fan
- Mount the fan along the PVC pipe, typically in the attic or an external wall, ensuring continuous airflow.
- Ensure electrical connections are safe and comply with local codes.
Step 6 Vent Above the Roofline
- Extend the pipe above the roof to release radon gas safely away from windows, vents, and air intakes.
- Install flashing and weatherproofing to prevent leaks.
Step 7 Test the System
- Use a pressure gauge to verify that the system is creating adequate suction.
- After a few weeks of operation, perform a radon test to confirm that indoor levels have decreased below recommended limits.
Maintenance and Monitoring
Once installed, regular maintenance ensures the system continues to operate effectively. The fan should run continuously, and homeowners should check the pressure gauge periodically to ensure proper suction. Visual inspections of the piping and foundation seals help detect any wear or damage. Retesting for radon every two years or after major renovations is recommended to maintain a safe indoor environment.
Safety Considerations
Working with radon mitigation systems involves drilling and electrical work. Safety precautions include wearing protective gear, ensuring proper ventilation during drilling, and following electrical codes when installing the fan. Hiring a certified radon mitigation professional can reduce risks and ensure compliance with local regulations.
Installing a radon mitigation system is an effective way to reduce harmful radon levels in your home, protecting the health of residents. By understanding the risks of radon, selecting the appropriate system, and following a detailed installation process, homeowners can significantly decrease exposure. Regular maintenance and monitoring ensure long-term effectiveness, while safety precautions during installation protect both the installer and the home. Whether using sub-slab depressurization for a basement or sub-membrane systems for a crawl space, proper installation and operation of a radon mitigation system provide peace of mind and a healthier living environment.
By taking these steps seriously, homeowners not only comply with safety recommendations but also create a safer home for their families. Understanding the principles of radon movement, ensuring proper venting, and maintaining system integrity are crucial components of successful radon mitigation. Investing in a well-installed system today prevents long-term health risks and ensures a sustainable solution for indoor air quality management.